A Quilt – My very first one

Tilda Quilt
Last weekend at our spinning group a lady brought a patchwork project and some supplies and gave a mini patchwork and quilting workshop. I stood on the sidelines and watched with interest. The whole thing look intriguing and easy enough and my curiosity was piqued. Could I do this? Sew lines straight enough to make the squares fit? I’d dabbled in making clothes in the past and I’d like to think I’m a decent seamstress on a good day. Would do it more often if it wouldn’t mean you had to tediously copy a pattern from a huge pattern sheet and cutting all those pieces beforehand. Somehow patchwork and quilting seemed more straight forward than sewing clothes.
To start out simple I decided to forego the cutting altogether. Yes, I know. It felt a bit like cheating but I was a bit scared of the whole cutting experience. I found a few cute sample packs of Tilda fabrics already precut to a handy 11.5 x 11.5 cm online. The four sample packs supplied me with 86 patches of fabric. Bought me some books to go with the patches and off I went. First step was arranging the patches on the living room floor and shifting things this way and that. Once I had decided on a final installation I had used up 84 of my 86 patches in a 7 x 12 grid. Packed them into neat stacks and took them to my trusty albeit slightly wonky sewing machine.
Piecing together all seven patches into one strip and repeat 12 times. This was the easy part. It worked out nicely. Next came the part where I took the strips to the ironing board taking care to press the seams into the opposite direction on alternating stripes. Phew. Worked okay. Now on to piecing the strips together – making sure to match up the seams. Which was a bit of a bear but with some tricking and coaxing I got along okay. Not all of them lined up exactly but a surprising number of seams met perfectly 🙂

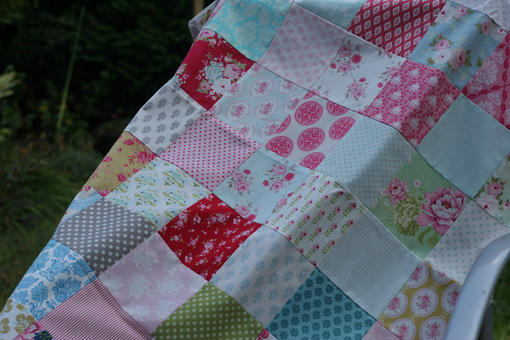
Matching seams 🙂
After ironing the finished quilt top I called it a day – or night, if you will.
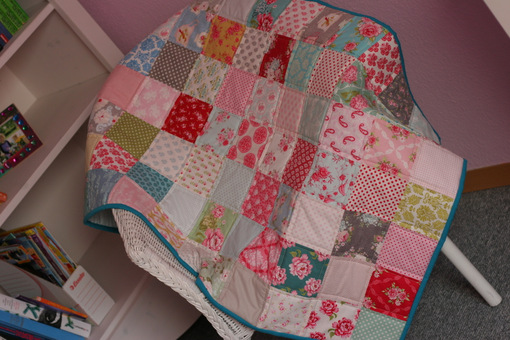
Finished quilt top
The next day I went shopping for some nice fabric for backside and binding and some notions as well. Needed clips and some serious pins. And you can never have too much thread. I found a cute dotted fabric in a mint color that went well with the quilt top and chose an intense turquoise cotton fabric for the binding. As batting I got an easy to care for polyester batting. Assembling the layers for the fairly small quilt wasn’t too difficult. Safety pins helped. Quilting the three layers posed a slightly bigger challenge – especially for my sewing machine. The fabric transport seemed to have trouble. But in the end we managed. Don’t look too closely on stitch length though. It will not be uniform. For quilting I mirrored the seam lines at the width of my sewing machine footer (0.75 mm). Turned out quite nice and now I was really excited to put the finishing touches to the small blanket.
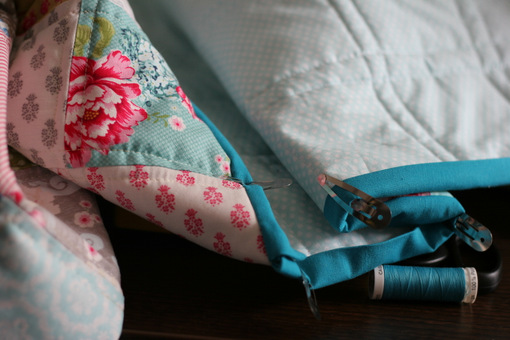
Binding – work in progress
For the binding I applied simple double faced strips that were machine stitched to the quilt and folded back and tacked in place by hand with matching thread. After seeing the final result I think I am in love. I’ve already gotten some more fabric to play with and can’t wait to start another one. Maybe a little play blanket for the upcoming baby. That’s the way down the rabbit hole, my friends ;o)
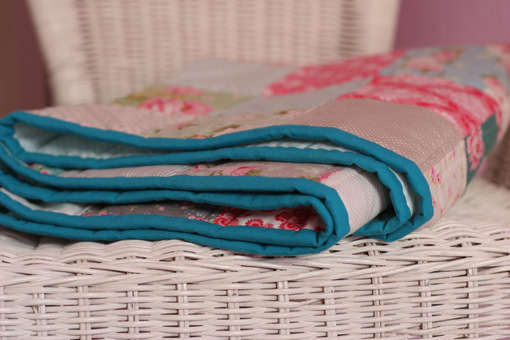
Hand-stitched turquoise binding
Schreibe einen Kommentar